Appearance
Web Installer Guide
The OmniSuite CMS includes a built-in web installer that automates the installation process. This guide will walk you through using the installer step by step.
🎥 Quick Installation Video
New to installation? Watch this step-by-step video to see the complete installation process on cPanel shared hosting:
💡 Tip: This video shows the web installer in action. The detailed guide below explains each step in depth.
Table of Contents
- Accessing the Installer
- Step 1: Welcome & Requirements
- Step 2: License Verification
- Step 3: Environment Configuration
- Step 4: Database Configuration
- Step 5: Admin Account Setup
- Step 6: Installation Progress
- Step 7: Completion
- Troubleshooting
Accessing the Installer
Prerequisites
Before accessing the installer, ensure:
- ✅ Files are uploaded to your server
- ✅ File permissions are set correctly (755 for directories, 644 for files)
- ✅ Database is created and credentials are ready
- ✅ Domain or subdomain is configured (subdomain recommended)
- ✅ Server meets System Requirements
Important: For cPanel installations, we strongly recommend using a subdomain (e.g., app.yourdomain.com) rather than installing in a subdirectory. This follows Laravel best practices and ensures proper routing and asset loading.
Access URL
Navigate to your domain or subdomain in a web browser:
For Main Domain:
http://yourdomain.com/installor
https://yourdomain.com/installFor Subdomain (Recommended for cPanel):
http://app.yourdomain.com/installor
https://app.yourdomain.com/installImportant: Laravel applications work best when installed on a main domain or subdomain. Avoid installing in subdirectories as it can cause routing and asset loading issues.
First Time Access
On first access, you'll see the Welcome screen. The installer will automatically check your server requirements.
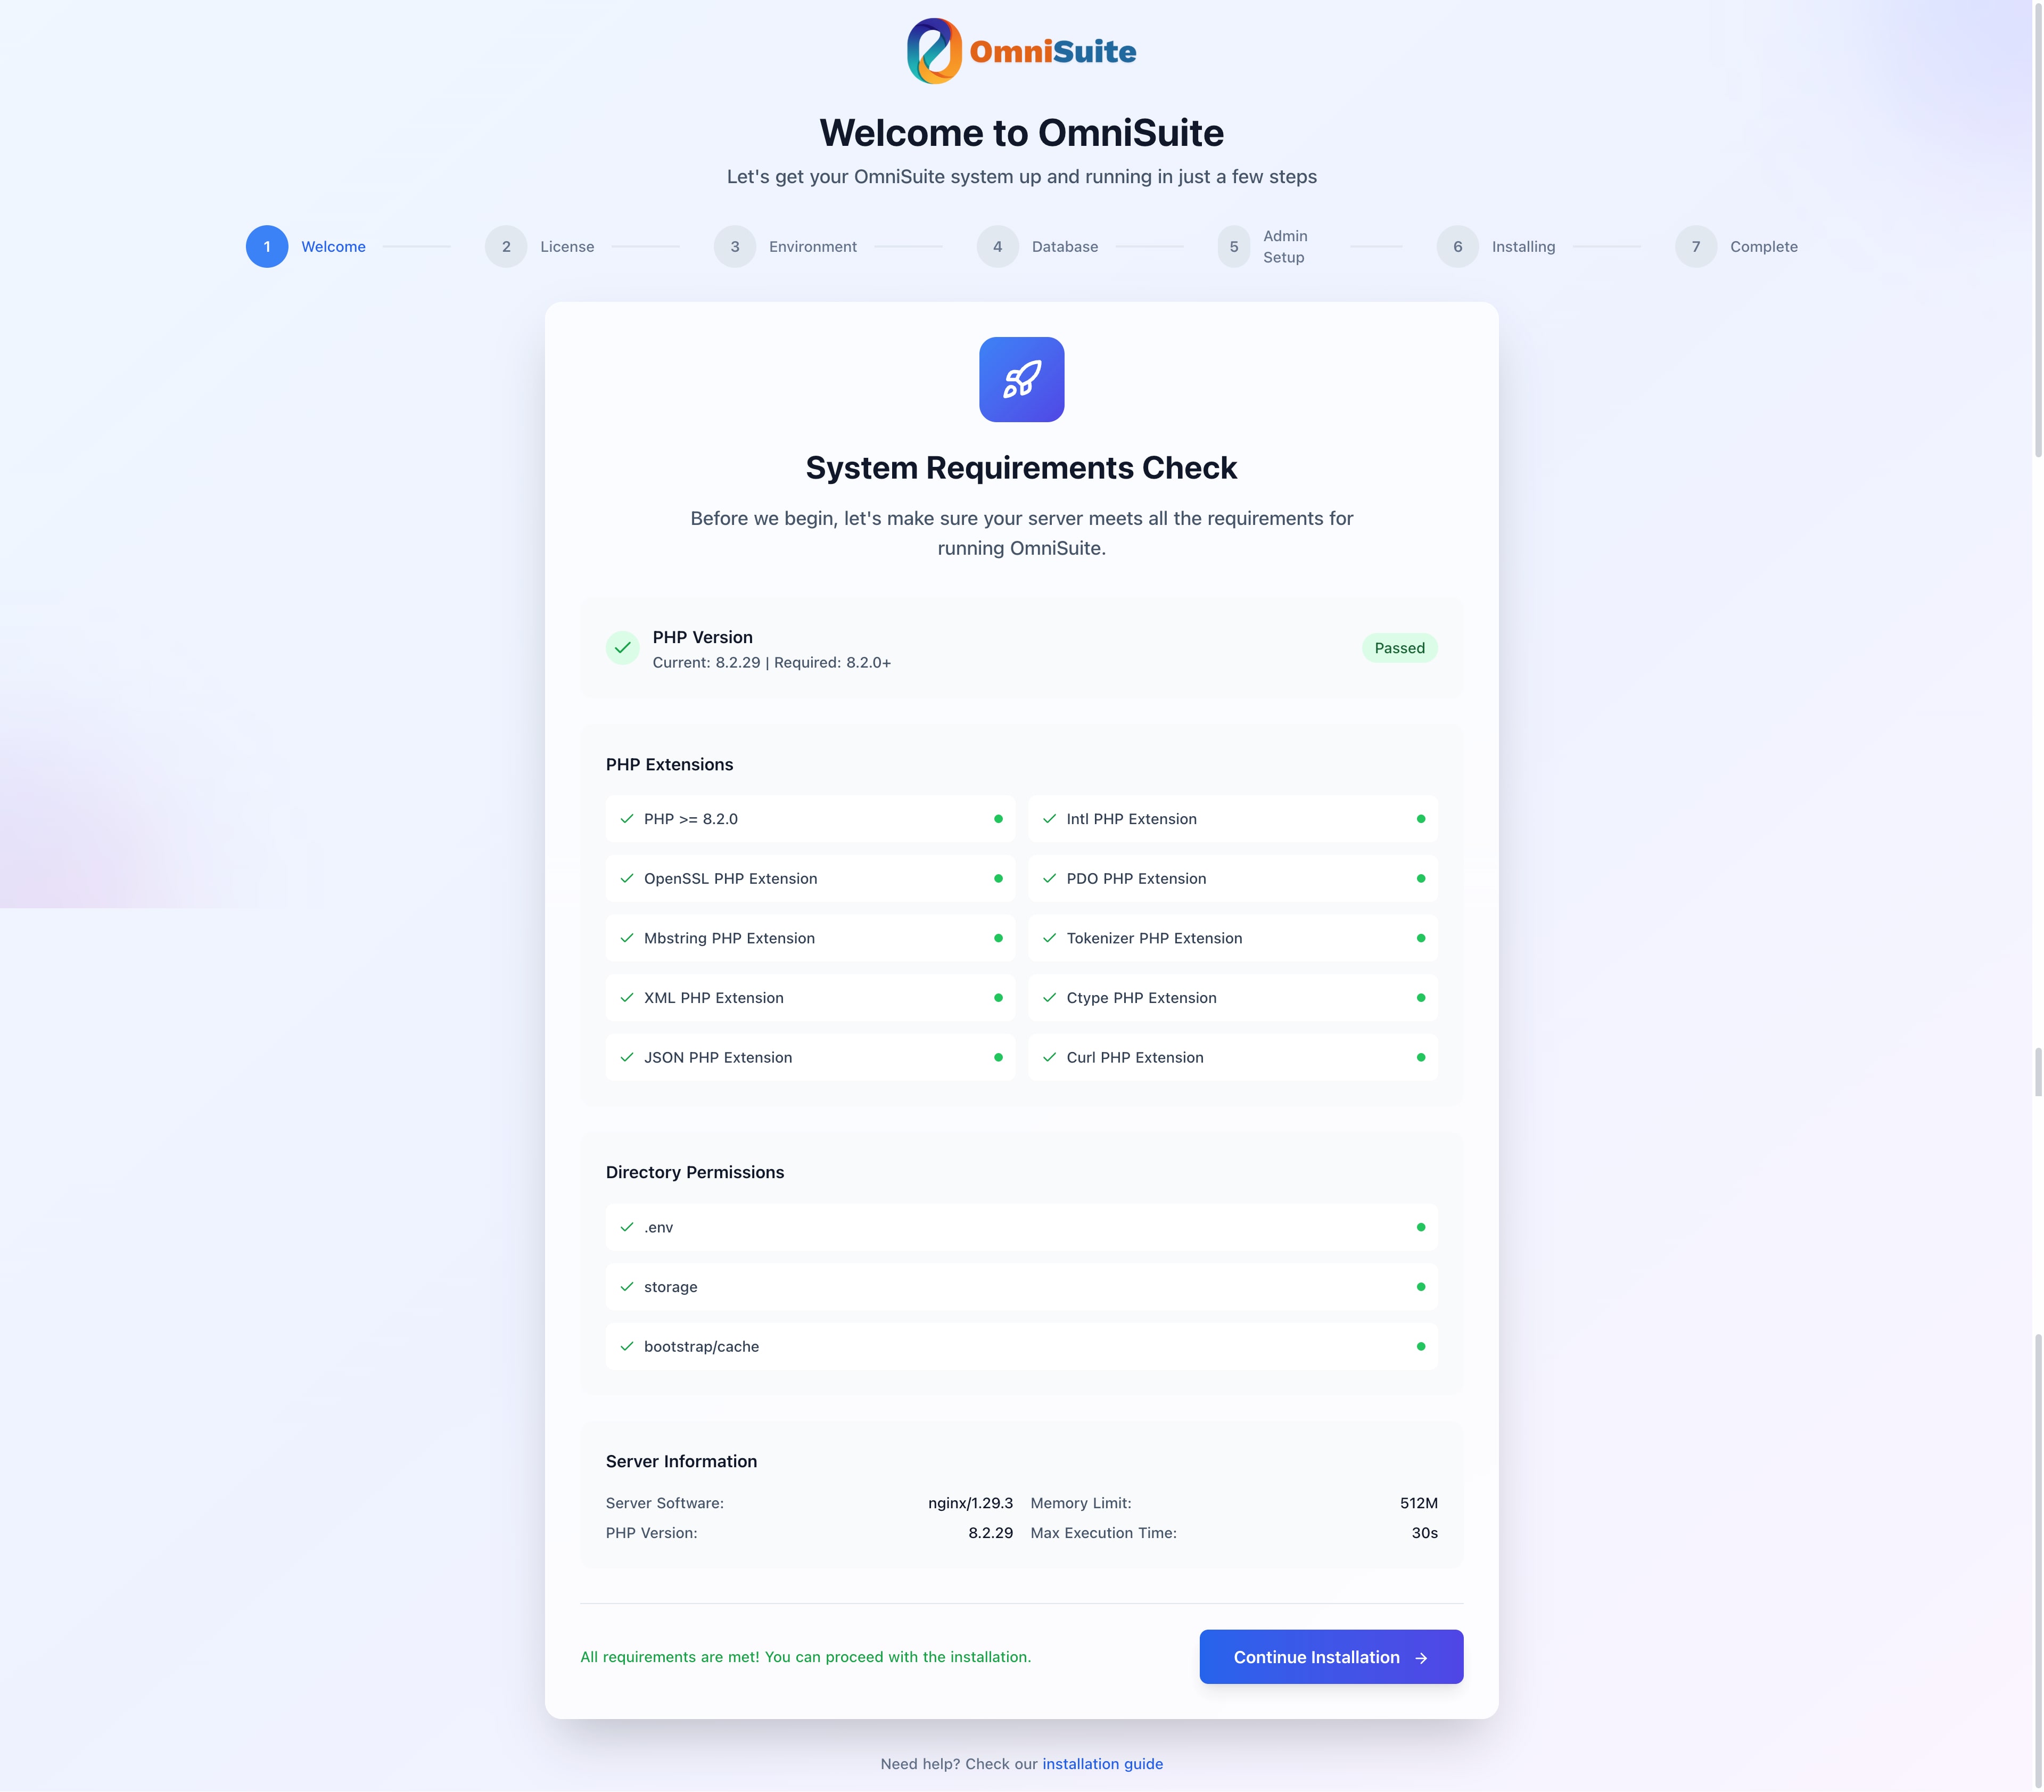
Welcome & Requirements Screen
Step 1: Welcome & Requirements
What This Step Does
The installer automatically checks:
- PHP version (must be 8.2.0+)
- Required PHP extensions
- Directory permissions
- Server configuration
Requirements Check
You'll see a checklist with the following items:
PHP Version
- ✅ Required: PHP 8.2.0 or higher
- Shows your current PHP version
- Must show green checkmark to proceed
PHP Extensions
Checks for required extensions:
- ✅ OpenSSL
- ✅ PDO
- ✅ Mbstring
- ✅ Tokenizer
- ✅ XML
- ✅ Ctype
- ✅ JSON
- ✅ cURL
- ✅ Intl
Directory Permissions
Checks if these directories are writable:
- ✅
.envfile (or base directory) - ✅
storage/directory - ✅
bootstrap/cache/directory
If Requirements Fail
PHP Version Too Old:
- Contact your hosting provider to upgrade PHP to 8.2 or higher
- Or use cPanel "Select PHP Version" to choose PHP 8.2+
- Minimum required: PHP 8.2.0
Missing Extensions:
- Install missing extensions via your hosting control panel
- In cPanel: Go to "Select PHP Version" → "Extensions" → Enable required extensions
- Or contact your hosting provider to enable extensions
- Required extensions: OpenSSL, PDO, Mbstring, Tokenizer, XML, Ctype, JSON, cURL, Intl
Permission Issues:
- Set directory permissions to 755 for directories
- Set file permissions to 644 for files
- Ensure these directories are writable:
storage/and all subdirectoriesbootstrap/cache/.envfile (if it exists)
- In cPanel File Manager: Right-click → Change Permissions → Set to 755 (directories) or 644 (files)
Proceeding
Once all requirements show green checkmarks:
- Click Next or Continue button
- You'll proceed to License Verification
Step 2: License Verification
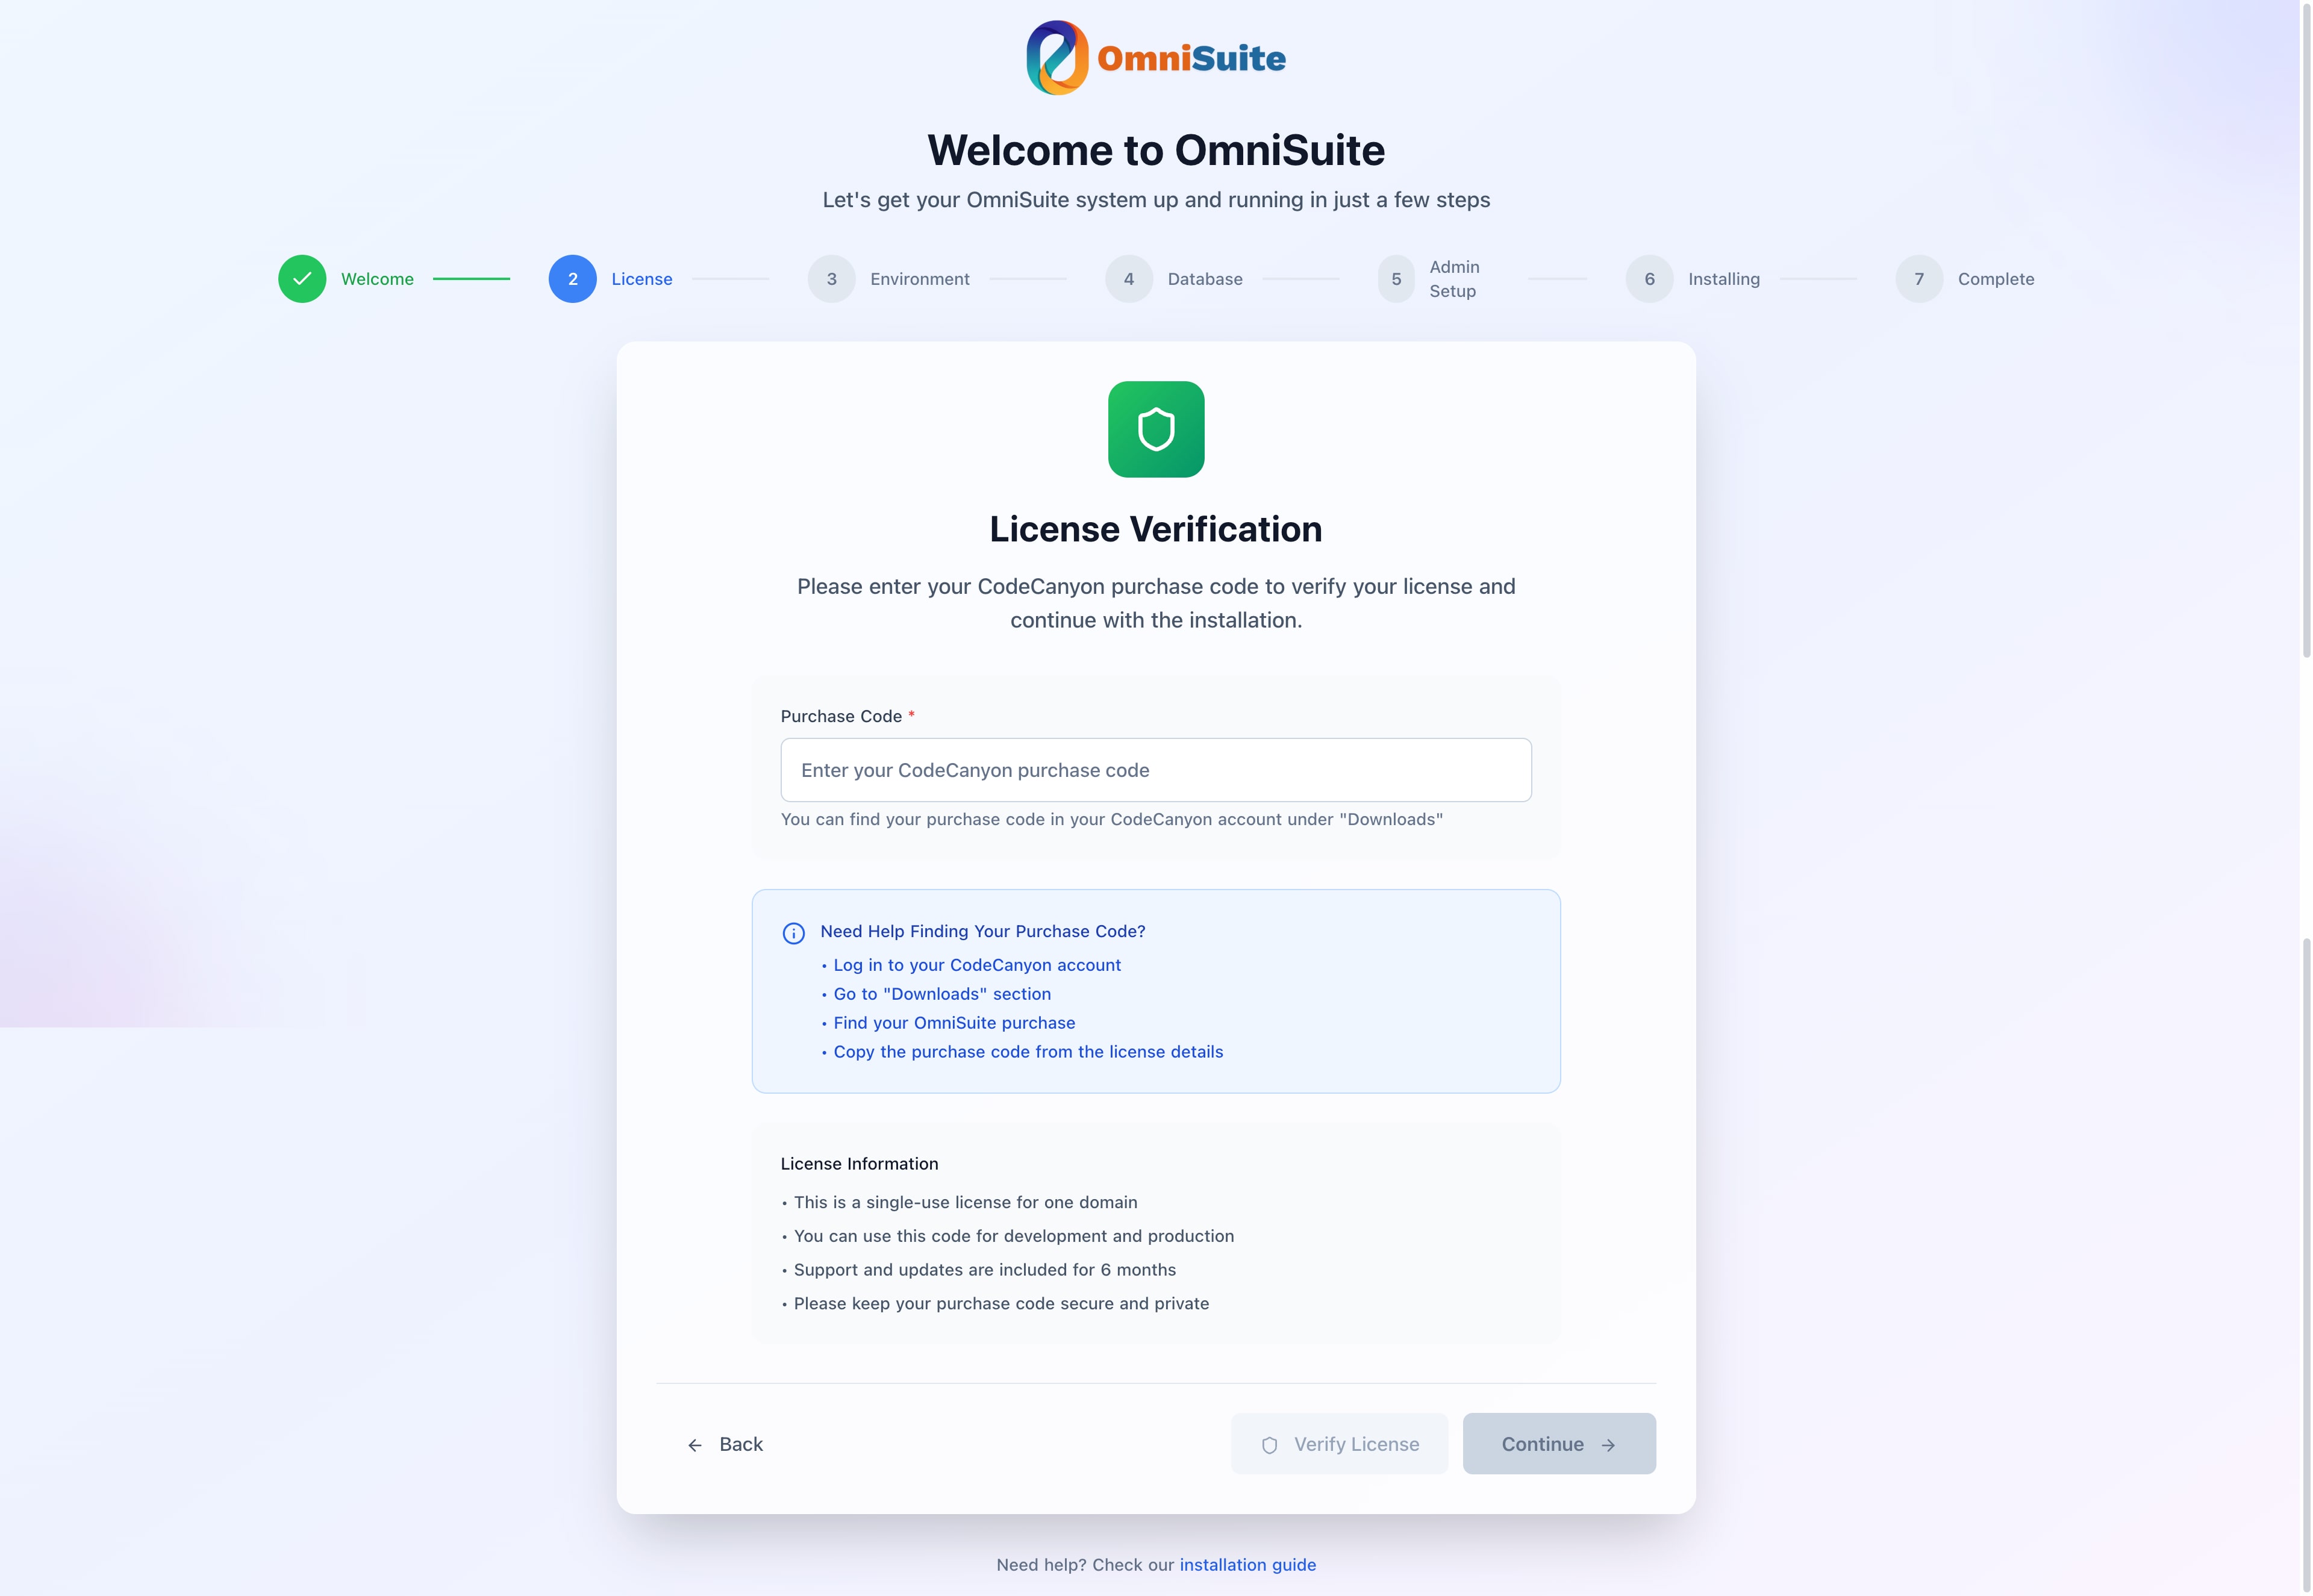
License Verification Screen
What This Step Does
The installer verifies your CodeCanyon purchase code to activate your license:
- Validates purchase code with license server
- Activates license for your domain
- Stores license information securely
Purchase Code
Enter your CodeCanyon purchase code:
- Format:
xxxxxxxx-xxxx-xxxx-xxxx-xxxxxxxxxxxx - Where to find: CodeCanyon → Downloads → Your Purchase → License Details
- Important: Code is domain-specific (one code per domain)
Verification Process
Enter Purchase Code
- Type or paste your purchase code in the input field
- Code format: 36 characters with hyphens
Click "Verify License"
- System validates code with license server
- Shows "Verifying..." status during validation
- Requires internet connection
Verification Result
- ✅ Success: Green checkmark appears, "License Verified Successfully"
- ❌ Failed: Red error message with details
Verification Status
Verified (Green Checkmark):
- License is valid and activated
- You can proceed to next step
- "Continue" button becomes enabled
Failed (Red X):
- Invalid purchase code
- Code already used on another domain
- Network error during verification
- License server unavailable
Common License Issues
"Invalid Purchase Code":
- Verify code is copied correctly (no extra spaces)
- Check code in your CodeCanyon account
- Ensure code hasn't been used on another domain
"License Already Activated":
- Purchase code can only be used on one domain
- Contact support for domain transfer if needed
- Or use a different purchase code
"Network Error During Verification":
- Check your internet connection
- Verify firewall allows HTTPS outbound (port 443)
- Try again after a few minutes
- Check if server can reach
api.softentra.com
"License Server Unavailable":
- License server may be temporarily down
- Wait a few minutes and try again
- Check license server status
License Information
- Single-use license: One purchase code per domain
- Development & Production: Can use same code for both
- Support: 6 months included with purchase
- Security: Keep your purchase code private
Proceeding
Once license is verified (green checkmark):
- Click Continue button
- You'll proceed to Environment Configuration
Note: License verification is required to proceed. You cannot skip this step.
Step 3: Environment Configuration
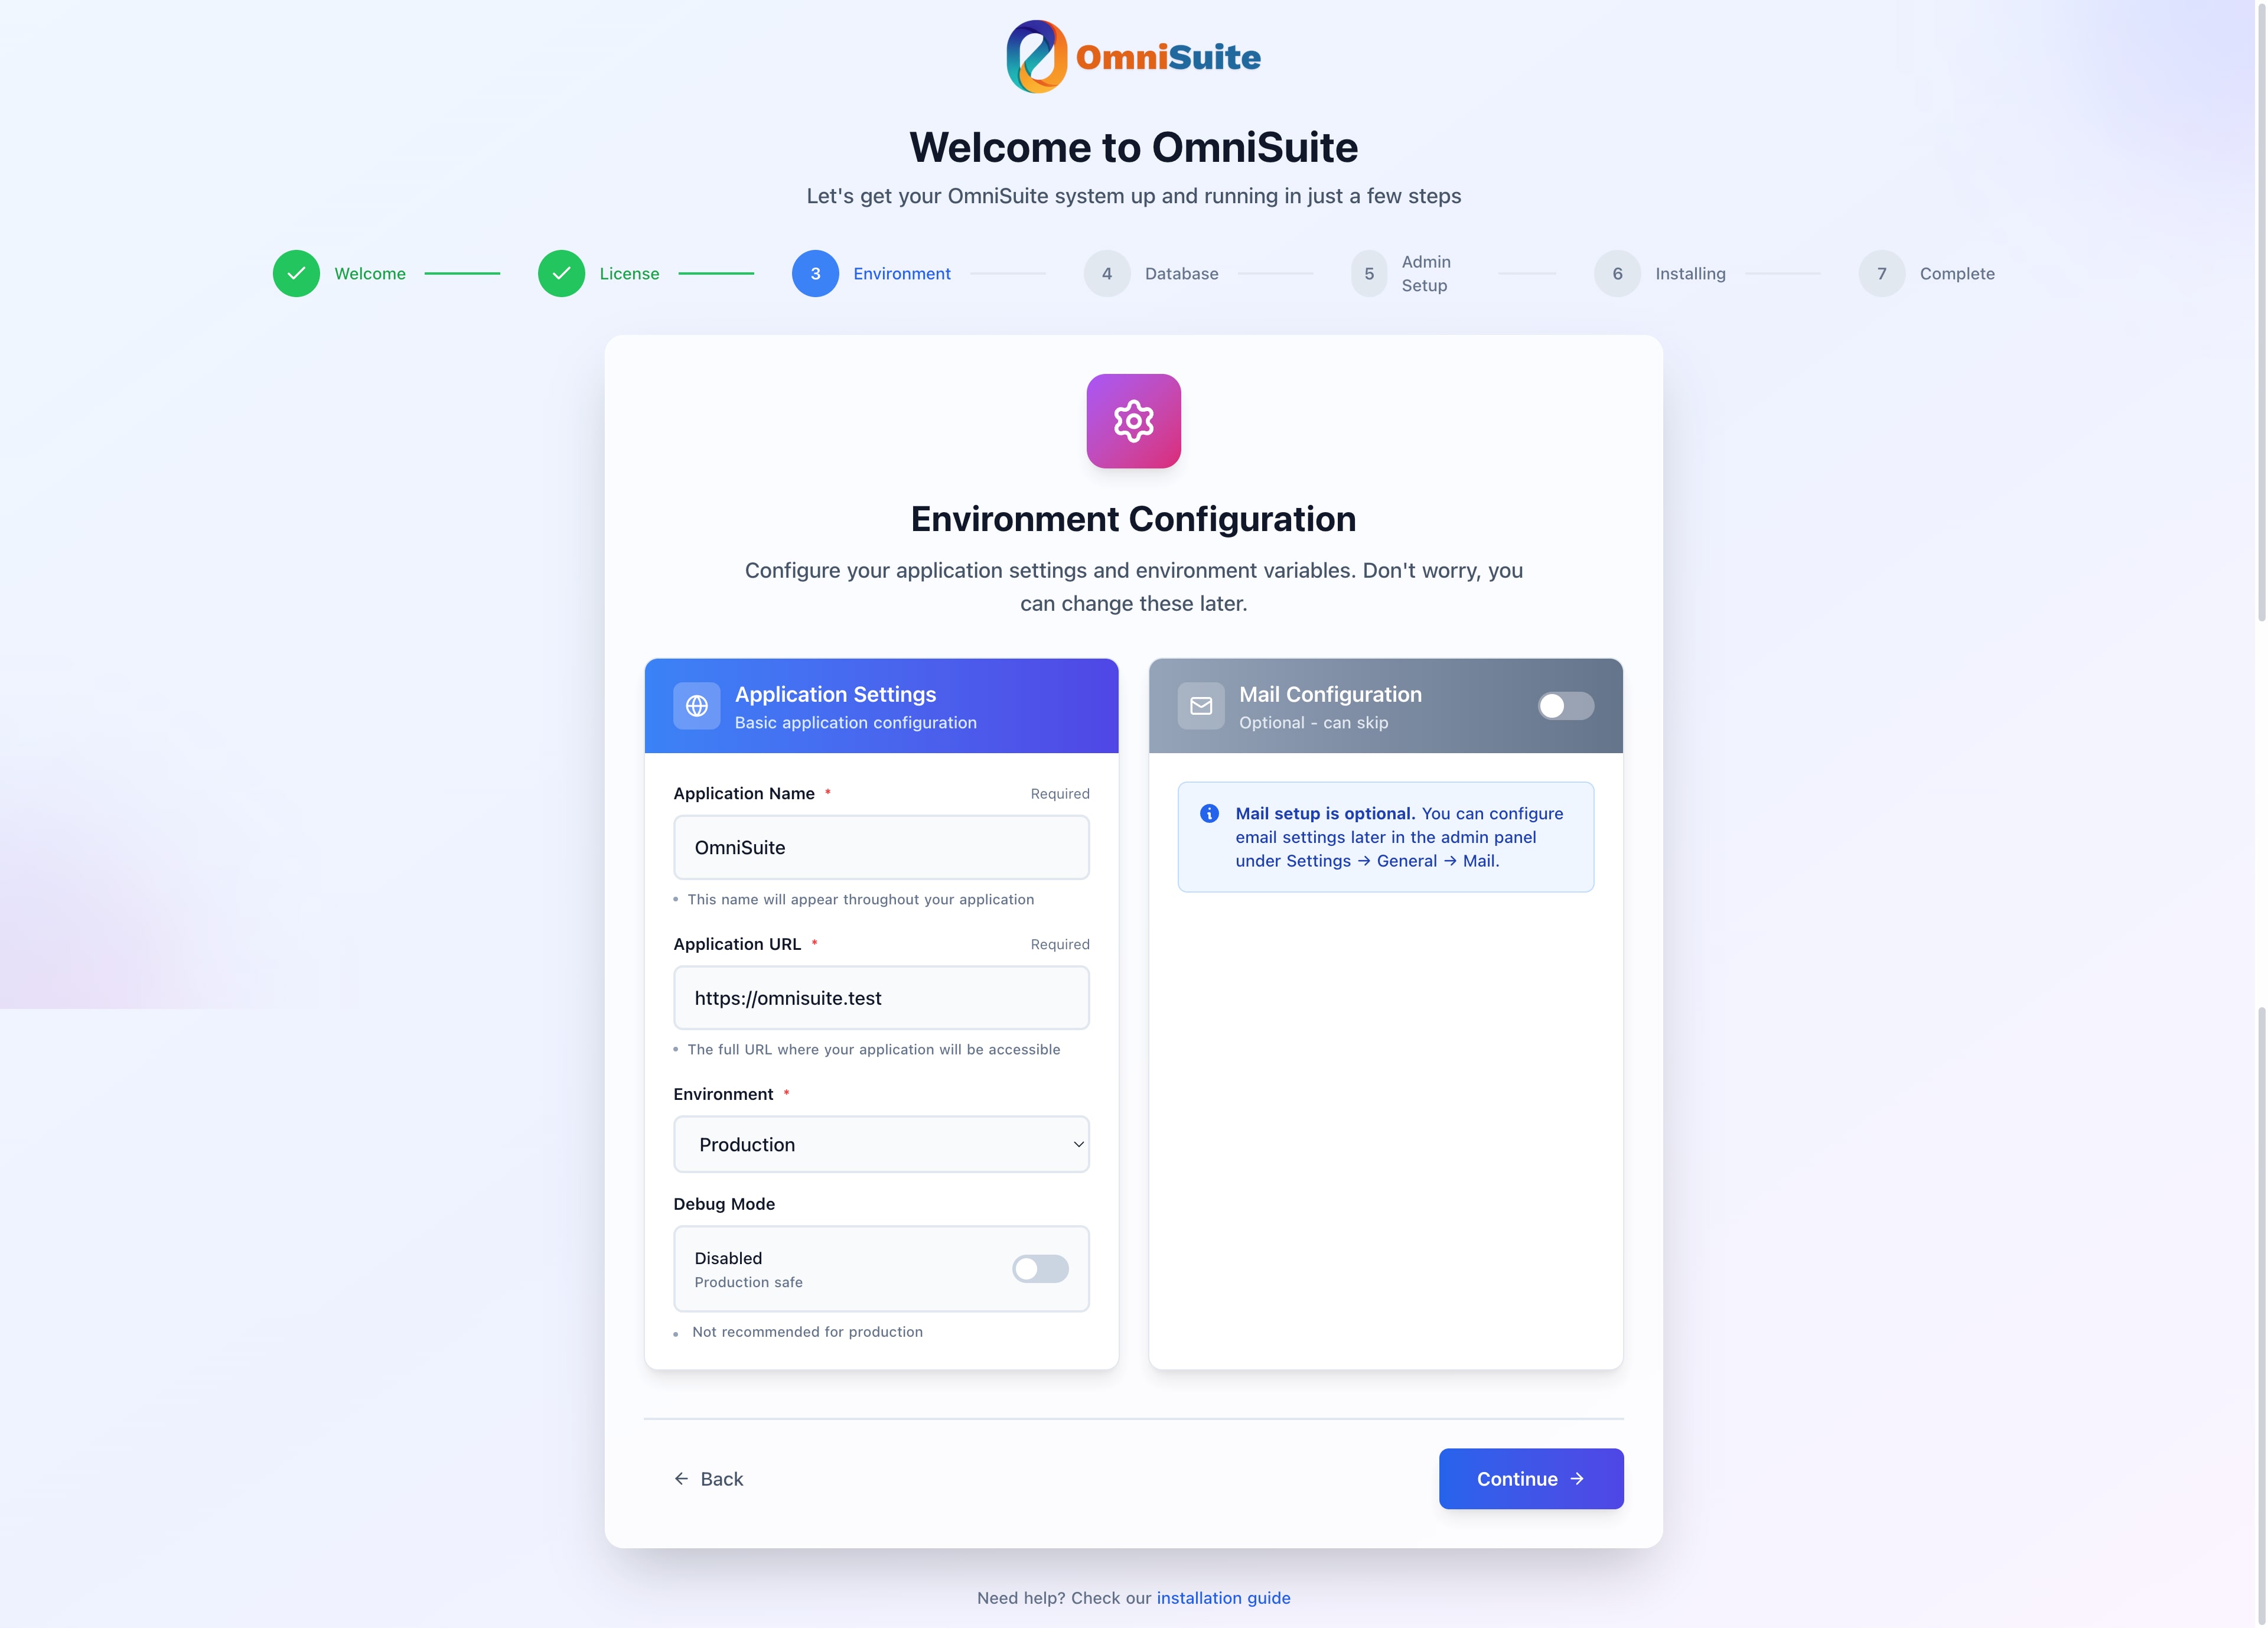
Environment Configuration Screen
App Information
App Name
- Enter your application/site name
- Example:
My Company WebsiteorOmniSuite CMS - This will be used throughout the application
- You can change this later in Settings
App URL
- Enter your full domain or subdomain URL
- Important:
- ✅ Include
http://orhttps://protocol - ✅ Use subdomain format (recommended):
https://app.yourdomain.com - ✅ Use main domain format:
https://yourdomain.com - ❌ Do not include trailing slash
- ❌ Do not include subdirectory paths
- ❌ Do not use subdirectories (e.g.,
/app,/cms)
- ✅ Include
Correct Examples:
- ✅
https://app.yourdomain.com(subdomain - recommended) - ✅
https://yourdomain.com(main domain) - ✅
http://app.yourdomain.com(HTTP for testing)
Incorrect Examples:
- ❌
yourdomain.com(missing protocol) - ❌
https://yourdomain.com/(trailing slash) - ❌
https://yourdomain.com/app(subdirectory - not recommended) - ❌
app.yourdomain.com(missing protocol)
Why Subdomain? Laravel applications work best on subdomains. Subdirectories can cause routing, asset loading, and session management issues.
Environment
Select your environment:
- Production: For live websites (recommended)
- Local: For local development
- Staging: For testing/staging servers
Mail Configuration (Optional)
You can configure email settings now or later:
Mail Driver
- SMTP: For most hosting providers (recommended)
- Sendmail: For servers with sendmail configured
- Mail: PHP mail function (not recommended)
SMTP Settings (if using SMTP)
- Host: SMTP server address (e.g.,
smtp.gmail.com) - Port: SMTP port (usually 587 or 465)
- Username: Your email address
- Password: Your email password
- Encryption: TLS or SSL
Note: You can configure email later in Settings if needed.
Proceeding
- Fill in required fields (App Name, App URL)
- Optionally configure mail settings
- Click Next to continue
Step 4: Database Configuration
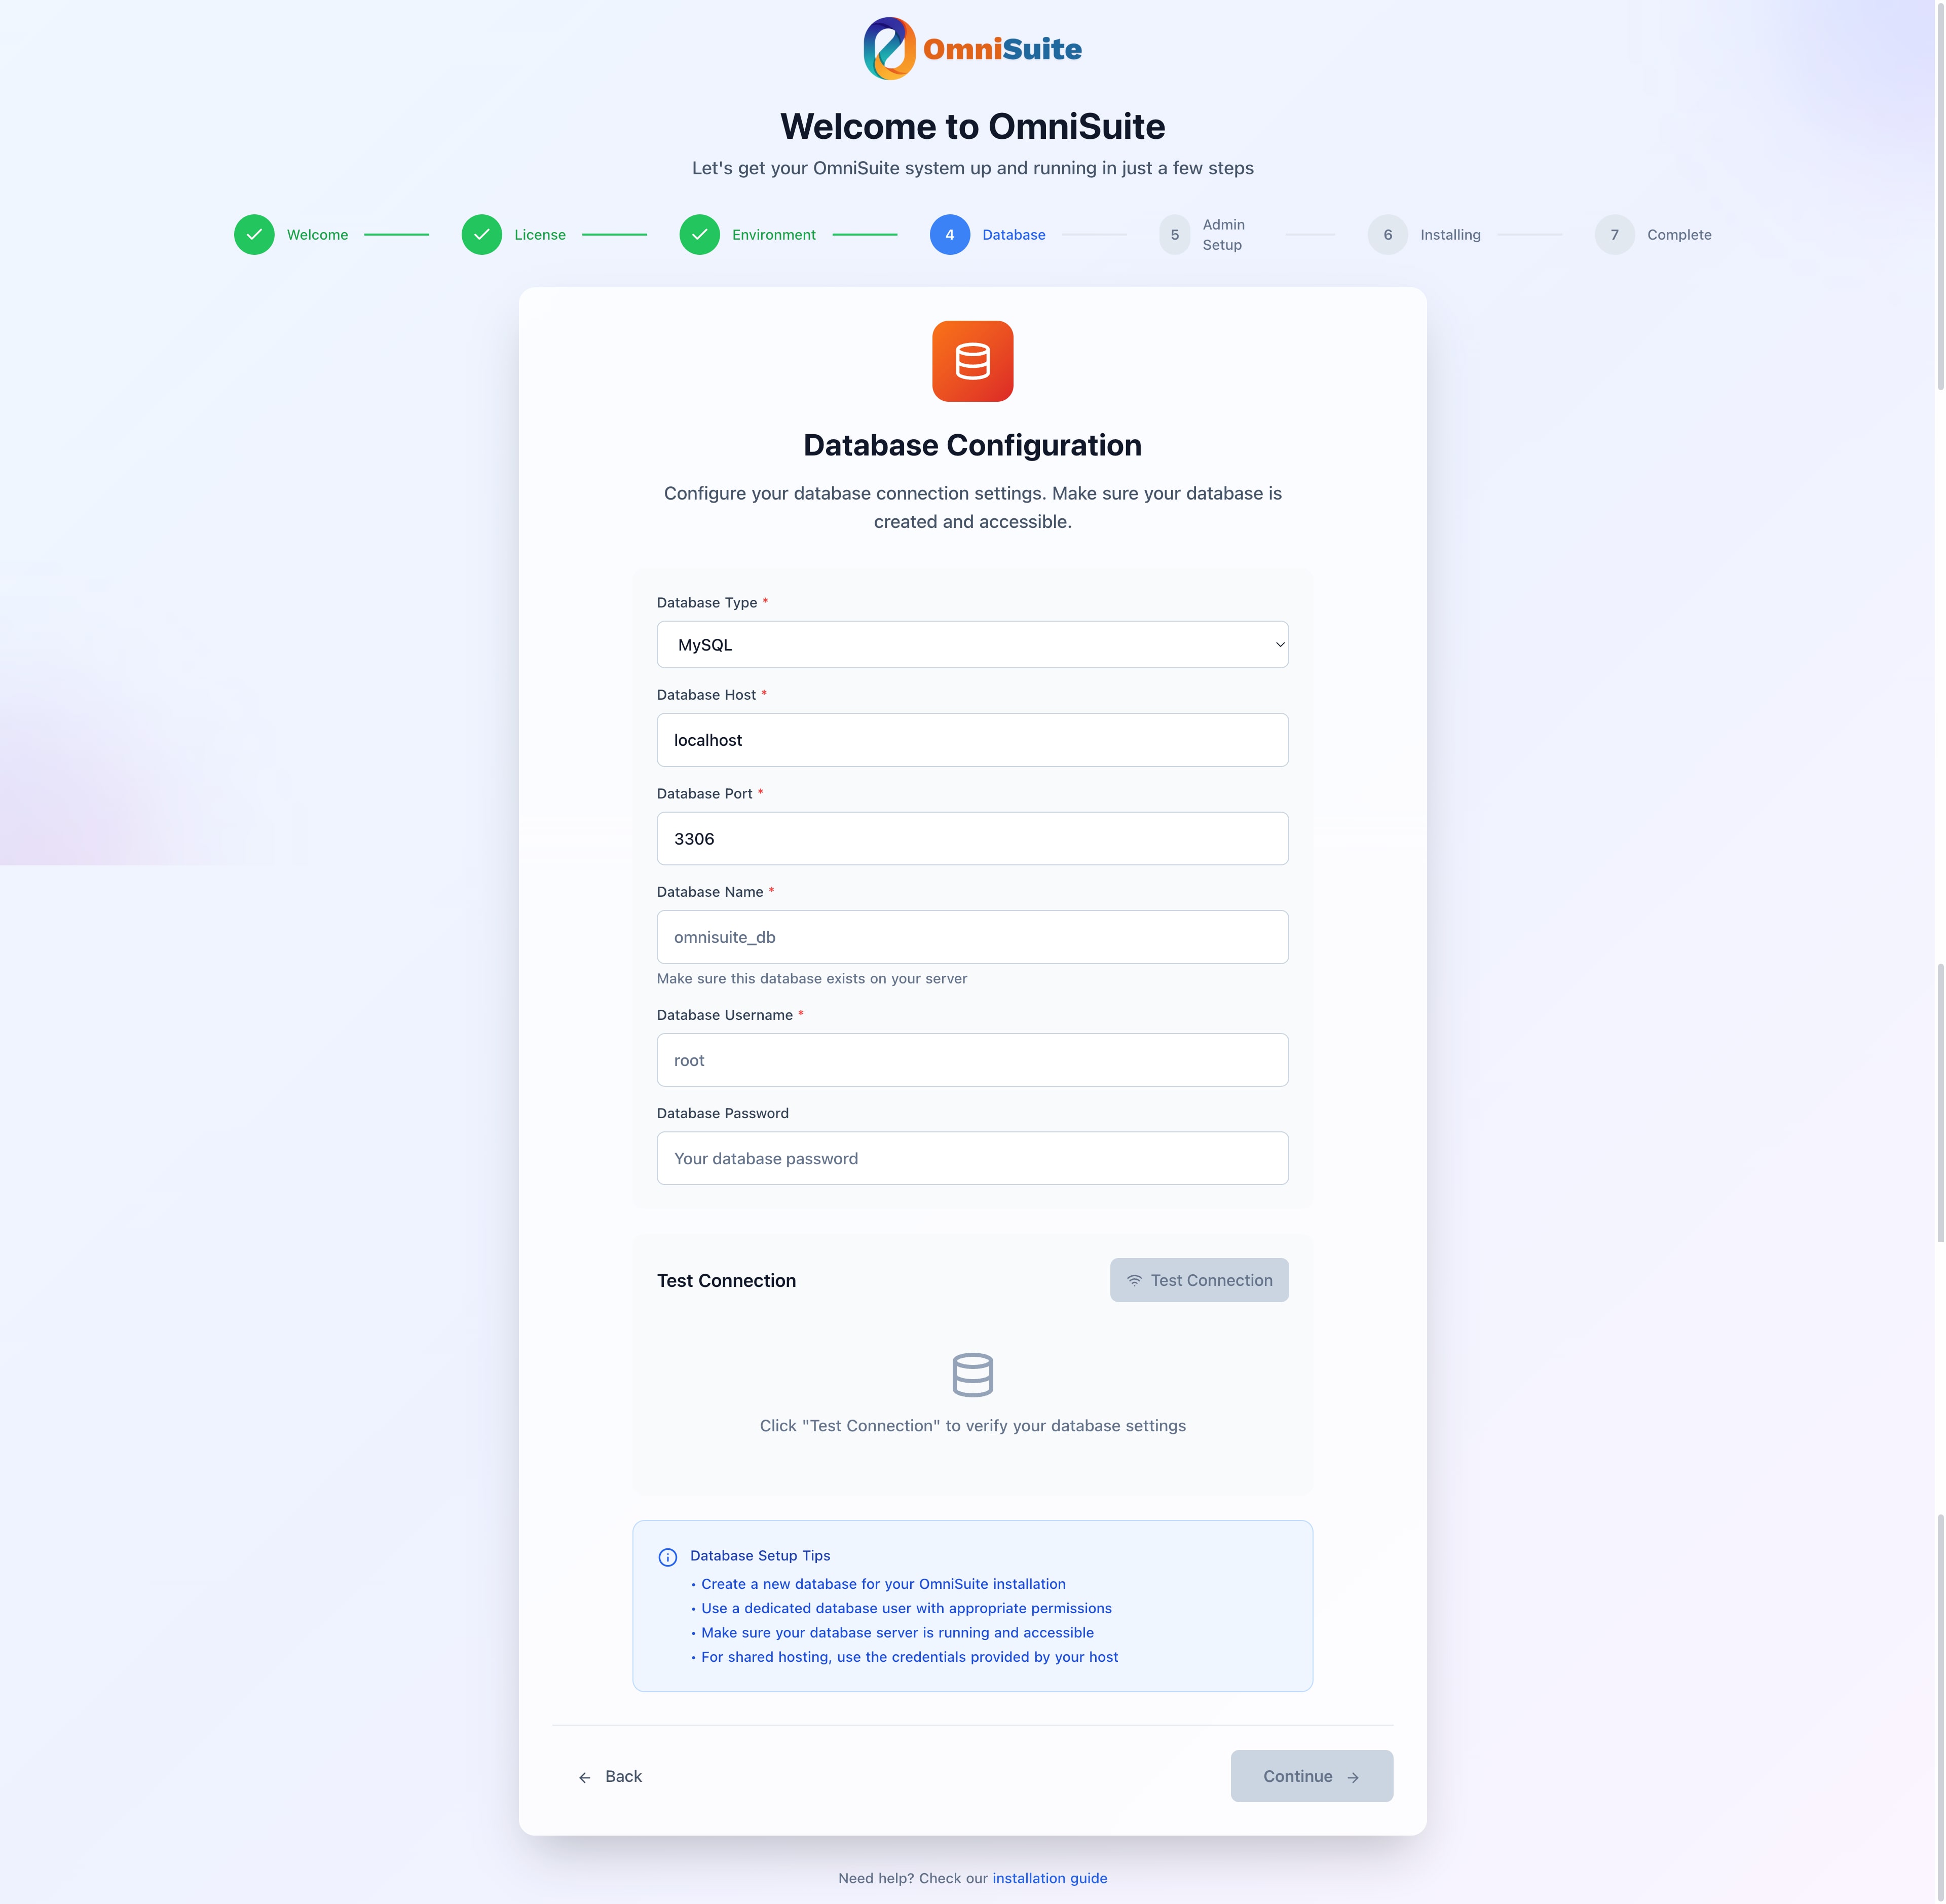
Database Configuration Screen
Database Connection Type
Select your database type:
- MySQL: Most common (recommended)
- PostgreSQL: Alternative database
- SQLite: For development only
MySQL Configuration
Enter your database credentials:
Database Host
- Usually:
localhost - Some hosts use:
127.0.0.1 - Check with your hosting provider if unsure
Database Port
- Default:
3306 - Usually doesn't need to be changed
Database Name
- The database you created earlier
- Example:
username_omnisuite_db - Important: Use the full database name as shown in cPanel
Database Username
- The database user you created
- Example:
username_omnisuite_user - Important: Use the full username as shown in cPanel
Database Password
- The password you set for the database user
- Enter it exactly as created
Test Connection
- Click Test Connection button
- Wait for connection test result
- Success: Green checkmark - proceed to next step
- Failure: Red error message - check credentials
Common Connection Issues
"Access denied for user":
- Verify username and password are correct (check for typos)
- In cPanel: Check if user has ALL PRIVILEGES on the database
- Ensure you're using the full username (e.g.,
username_omnisuite_user, not justomnisuite_user) - Try resetting the database user password in cPanel
"Unknown database":
- Verify database name is correct (check for typos)
- Ensure you're using the full database name (e.g.,
username_omnisuite_db) - In cPanel: Verify database exists in MySQL Databases section
- Ensure database was created successfully
"Can't connect to MySQL server":
- Check database host (usually
localhost, but some hosts use127.0.0.1or a different host) - In cPanel: Check with your hosting provider for the correct database host
- Verify database server is running
- Check firewall settings (if applicable)
- Try testing connection via phpMyAdmin first
Proceeding
Once connection test succeeds:
- Click Next to continue
- You'll proceed to Admin Account Setup
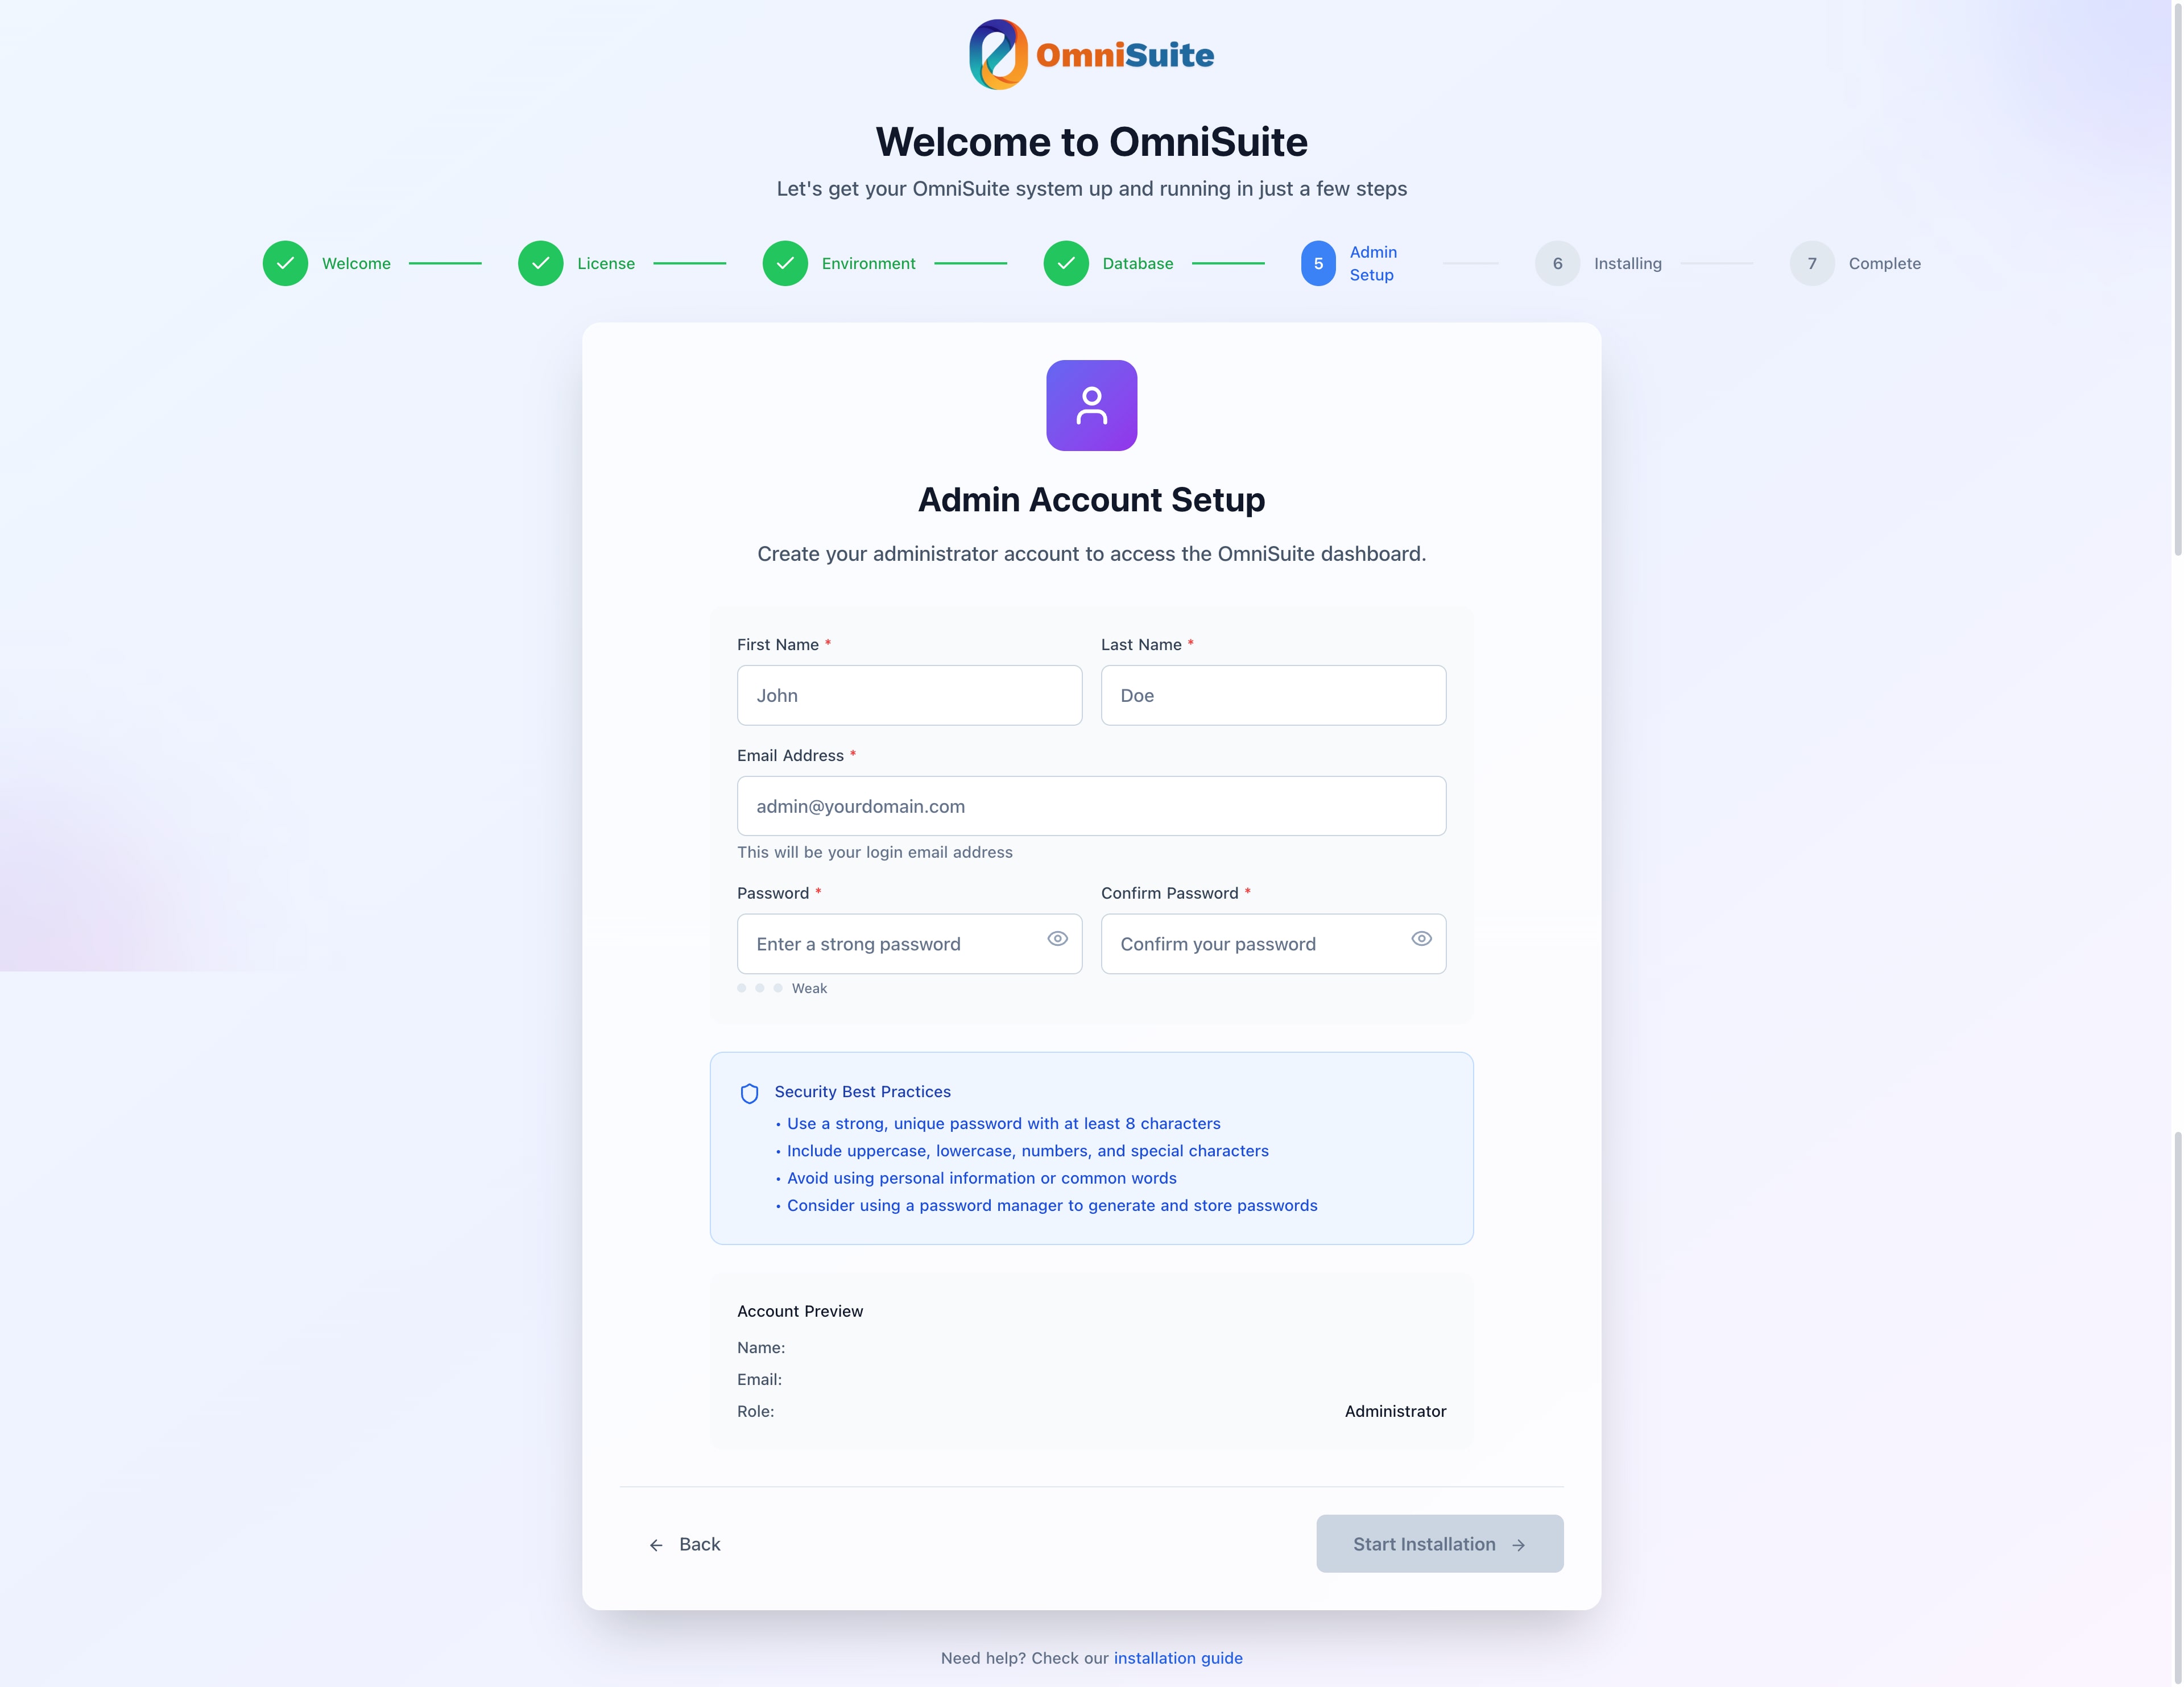
Step 5: Admin Account Setup
Admin Account Setup Screen
Administrator Information
Create your first administrator account:
First Name
- Your first name
- Example:
John
Last Name
- Your last name
- Example:
Doe
Email Address
- Your email address
- Important: Use a valid email you can access
- This will be used for:
- Login credentials
- Password resets
- System notifications
Password
- Minimum: 8 characters
- Recommended: 12+ characters with mix of:
- Uppercase letters
- Lowercase letters
- Numbers
- Special characters
- Example:
MySecureP@ss123!
Confirm Password
- Re-enter your password exactly
- Must match the password field
Security Notes
- ⚠️ Save your credentials in a secure location
- ⚠️ This account has full administrative access
- ⚠️ Use a strong, unique password
- ⚠️ Don't share these credentials
Proceeding
- Fill in all required fields
- Ensure passwords match
- Click Next to start installation
Step 6: Installation Progress
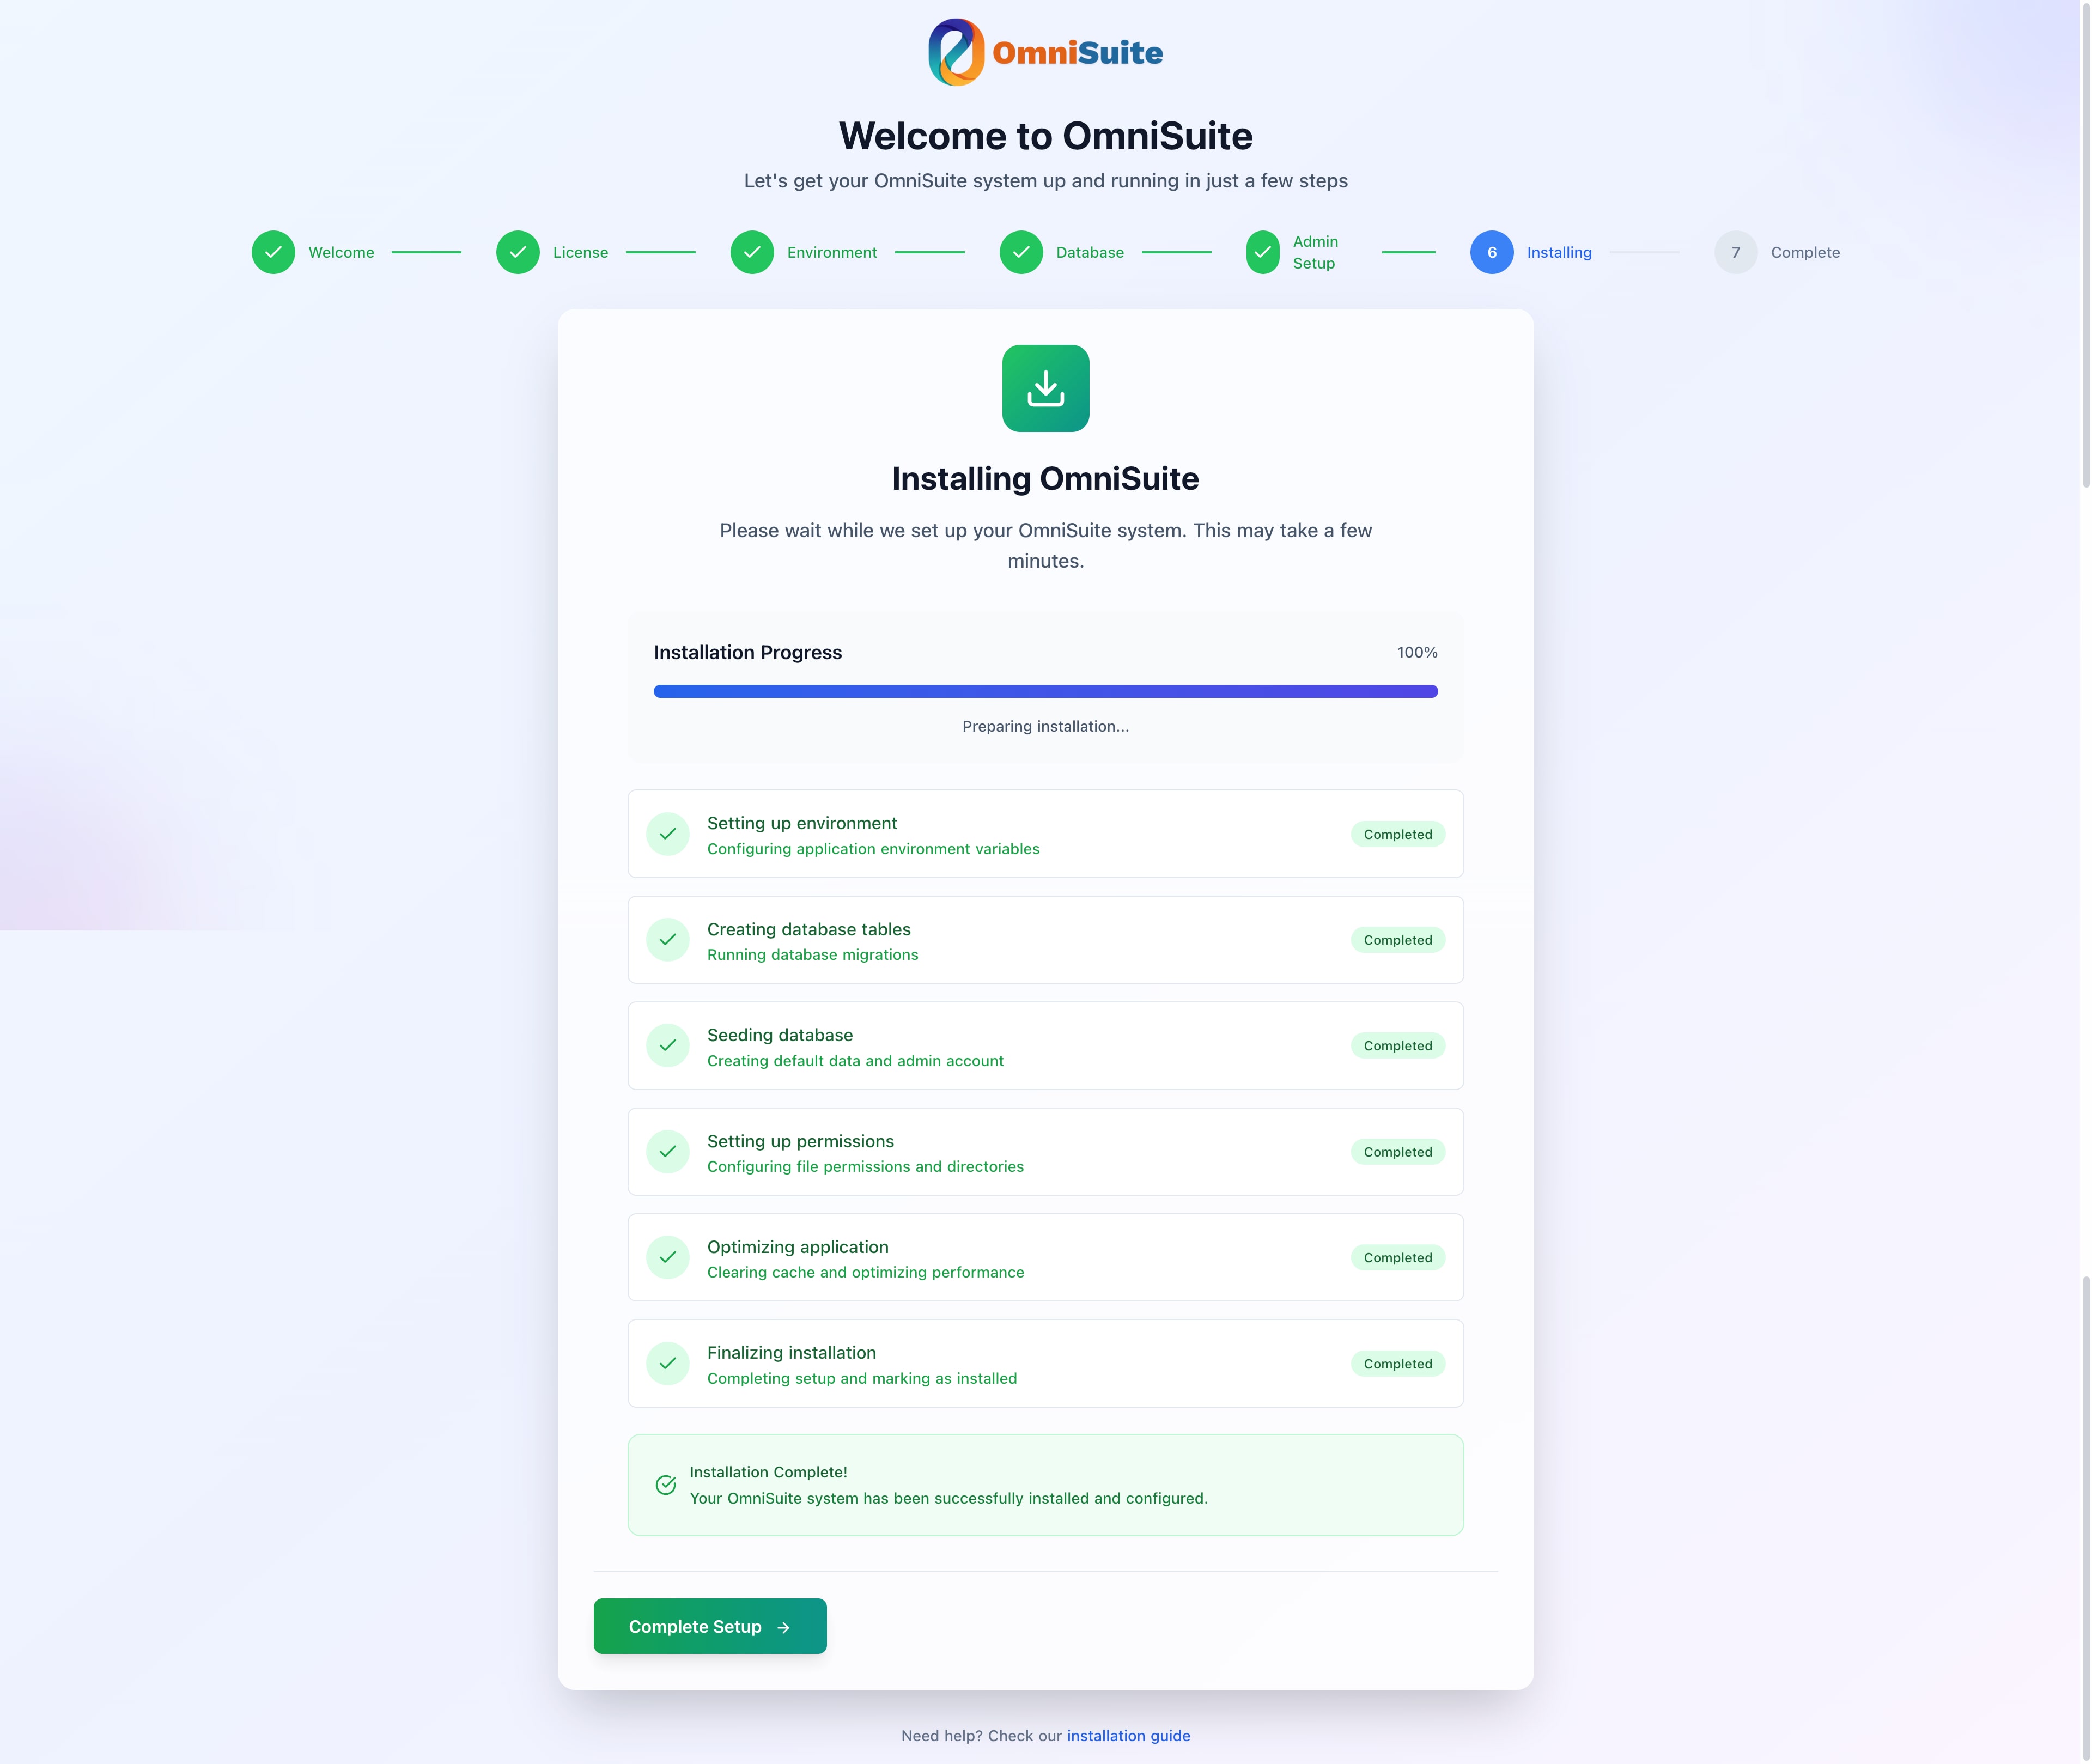
Installation Progress Screen
What Happens During Installation
The installer will automatically:
Save Configuration
- Creates
.envfile with your settings - Configures database connection
- Sets application environment
- Creates
Run Database Migrations
- Creates all required database tables
- Sets up database structure
- This may take 1-2 minutes
Seed Initial Data
- Creates default settings
- Adds initial module data
- Sets up default content
- This may take 1-2 minutes
Create Admin User
- Adds your administrator account
- Assigns admin role and permissions
Finalize Installation
- Marks application as installed
- Creates installation lock file
Progress Indicators
You'll see progress updates for:
- ✅ Configuration saved
- ✅ Database migrations completed
- ✅ Database seeded
- ✅ Admin user created
- ✅ Installation complete
Important Notes
- ⚠️ Do not close the browser during installation
- ⚠️ Do not refresh the page during installation
- ⚠️ Installation typically takes 2-5 minutes
- ⚠️ If it takes longer, check server resources
If Installation Fails
Error Messages:
- Read the error message carefully
- Common issues:
- Database connection lost
- Insufficient permissions
- PHP timeout
- Memory limit exceeded
Solutions:
- Check error message details
- Verify database is still accessible
- Check file permissions
- Increase PHP memory limit
- Increase PHP execution time
- Try installation again
Step 7: Completion
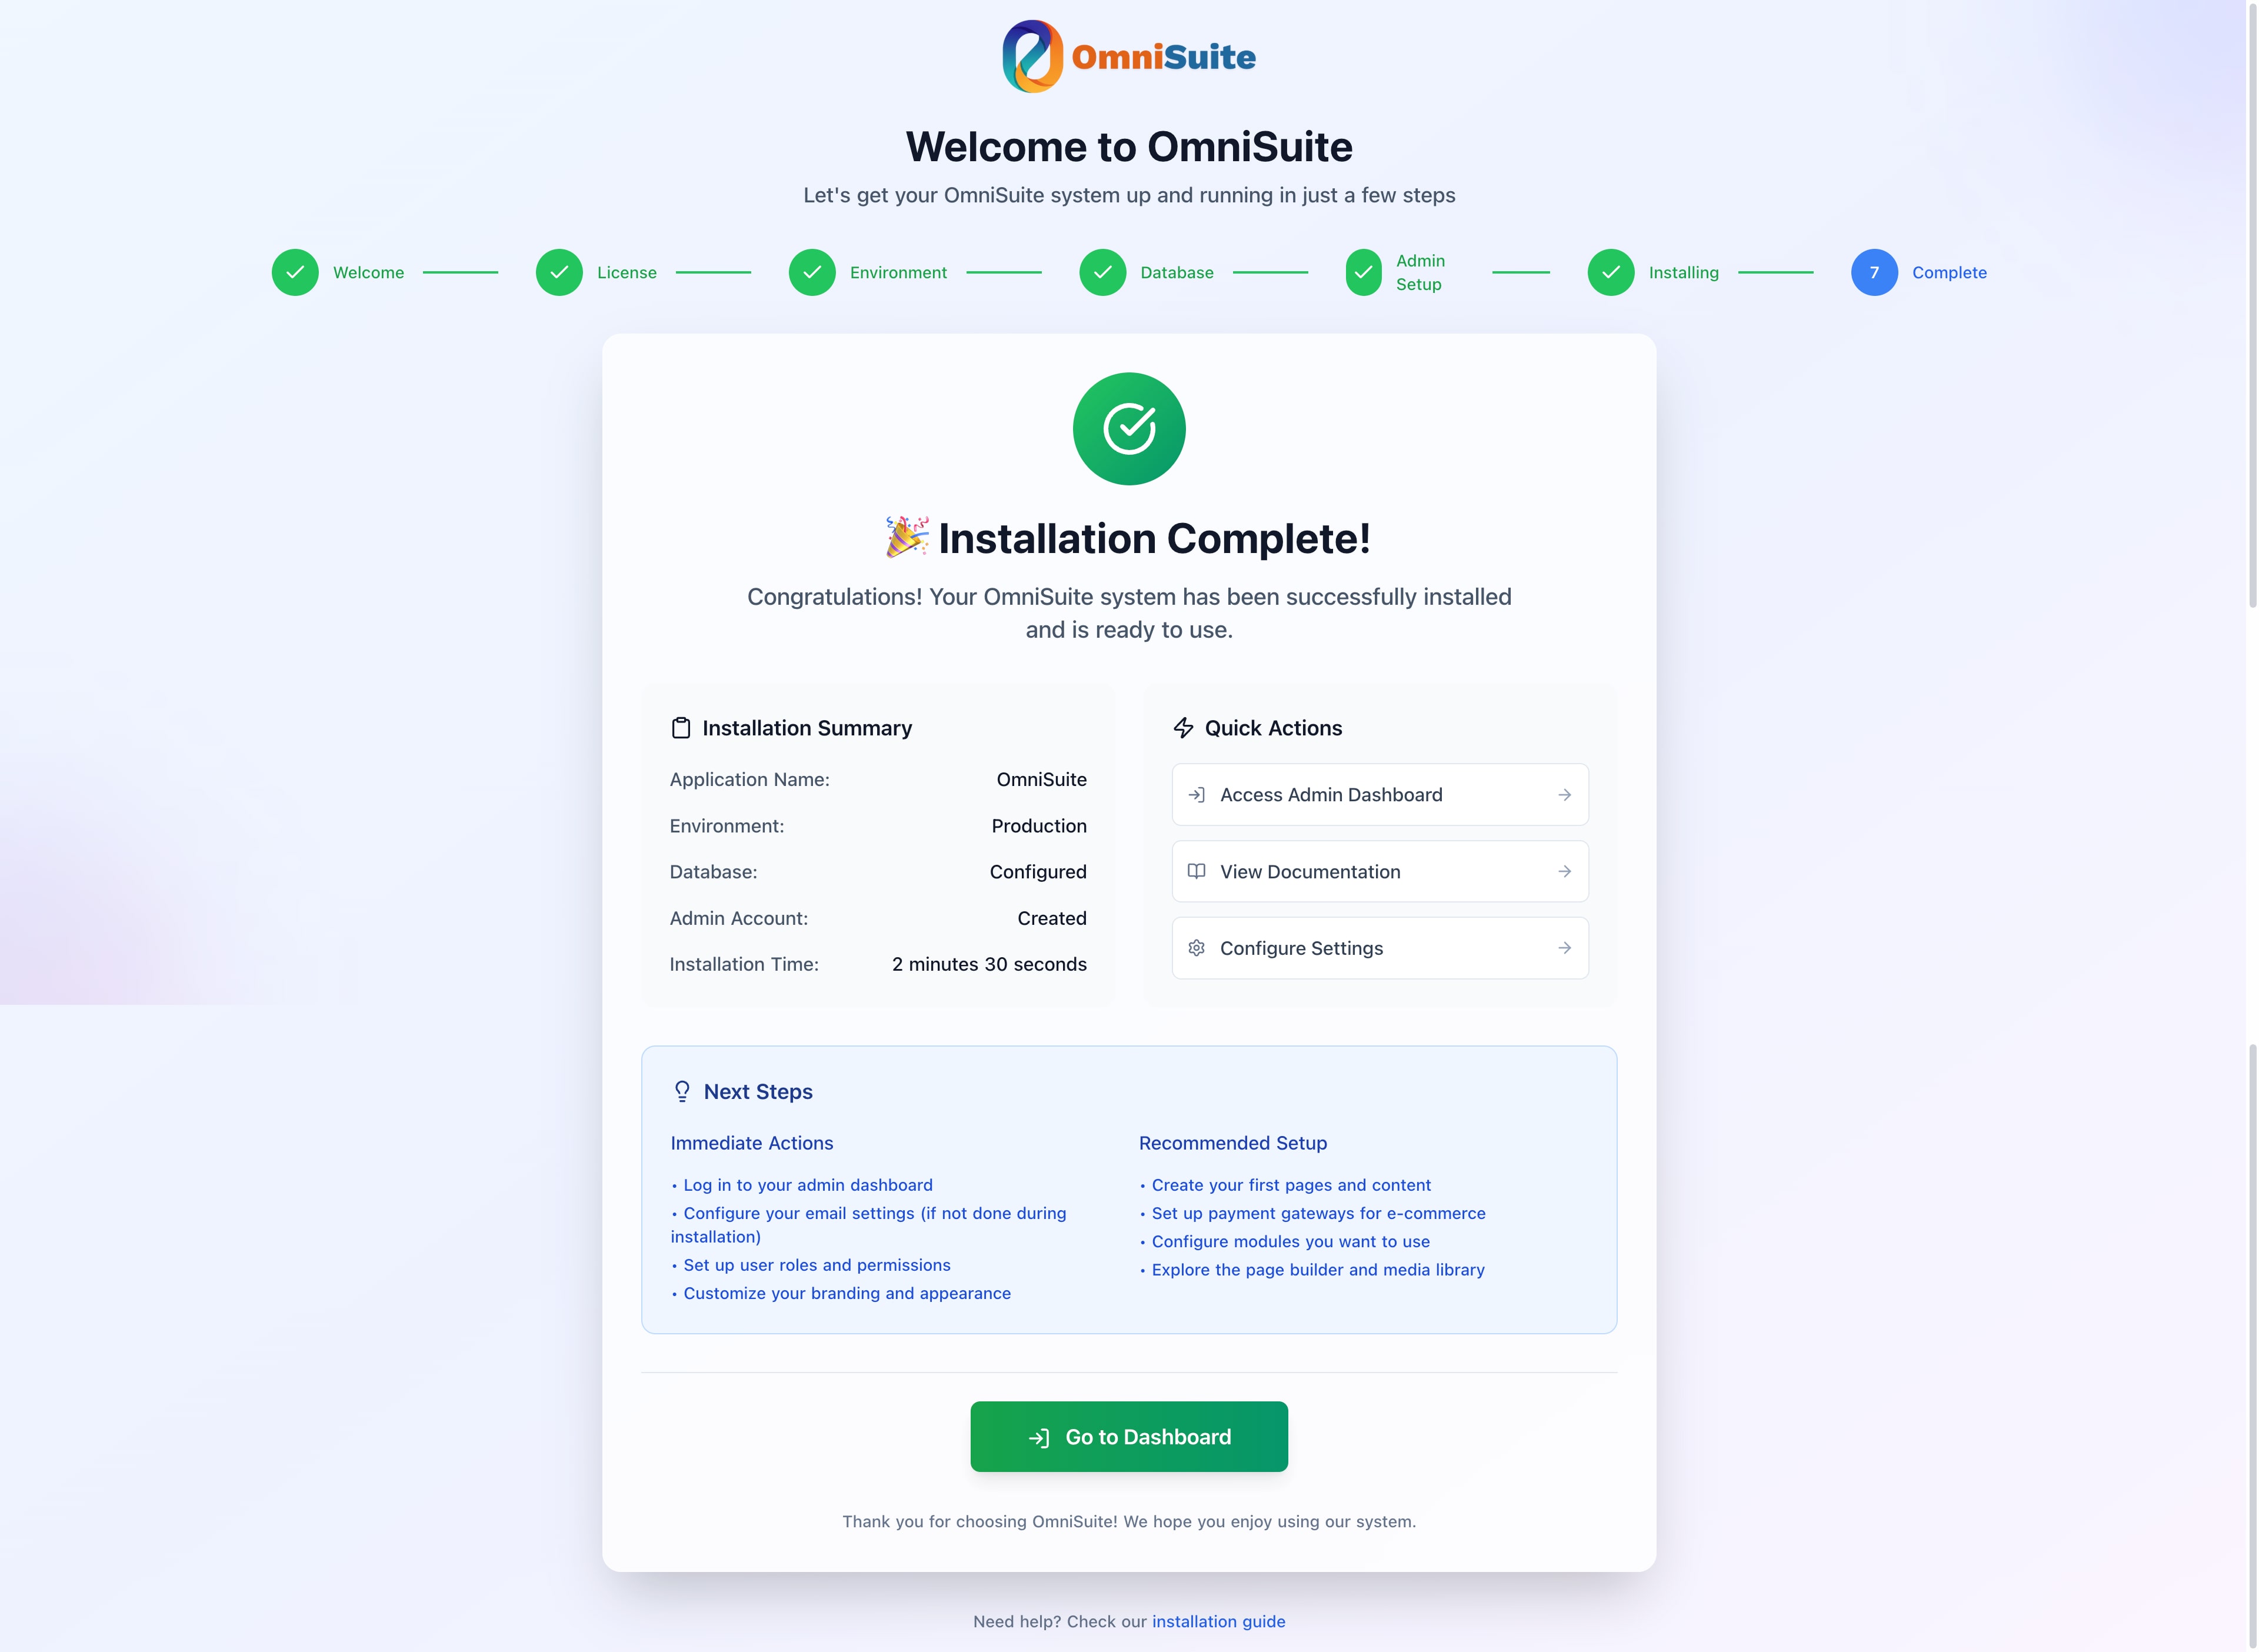
Installation Complete Screen
Success Message
Upon successful installation, you'll see:
- ✅ Installation Complete! message
- Success confirmation
- Link to login page
Next Steps
Click "Go to Login" button
- Or visit:
http://yourdomain.com/login(orhttp://app.yourdomain.com/loginfor subdomain)
- Or visit:
Log in with your admin credentials:
- Email: The email you entered in Step 4
- Password: The password you created
First Login:
- You'll be redirected to the admin dashboard
- Complete initial setup:
- Configure general settings
- Set up email (if not done during installation)
- Configure payment gateways (if needed)
- Review module settings
Installer Lock
After installation:
- The installer is automatically locked
- You cannot re-run the installer
- To reinstall, you must:
- Delete
.installedfile, or - Set
APP_INSTALLED=falsein.env
- Delete
Security Note: This prevents unauthorized reinstallation.
Troubleshooting
Installer Won't Load
Symptoms: 404 error or blank page
Solutions:
- Verify files are uploaded correctly
- Check
.htaccessfile exists - Verify mod_rewrite is enabled
- Try:
http://yourdomain.com/public/index.php
Requirements Check Fails
Solutions:
- Upgrade PHP to 8.2+
- Install missing PHP extensions
- Fix directory permissions (755 for directories)
- Contact hosting provider if issues persist
Database Connection Fails
Solutions:
- Double-check all credentials
- Verify database exists
- Check user has ALL PRIVILEGES
- Test connection via phpMyAdmin
- Verify database host (may not be
localhost)
Installation Hangs or Fails
Solutions:
- Check PHP execution time (should be 300+ seconds)
- Increase PHP memory limit (256MB+)
- Check server error logs
- Verify sufficient disk space
- Contact hosting provider
White Screen After Installation
Solutions:
- Check error logs
- Verify
.envfile exists and is readable - Check file permissions
- Clear browser cache
- Try accessing login page directly
Manual Installation Alternative
If the web installer doesn't work, you can install manually:
- Create
.envfile from.env.example - Configure database settings in
.env - Run:
php artisan migrate - Run:
php artisan db:seed - Create admin user manually
See VPS Installation Guide for detailed manual installation steps.
Next Steps
After successful installation:
- Review Post-Installation Setup
- Configure General Settings
- Read Getting Started Guide
Last Updated: [Date will be updated during final review]